A beginner’s guide to Git and its workflow — Part 1

As a Senior Principal Engineer at CVSHealth, I specialize in building and optimizing cvs.com to deliver a superior guest experience. Using the latest web technologies, my team and I work diligently to create a user-friendly and intuitive platform that exceeds expectations.
This post is intended to be an introduction to Git. I have tried to cover all the basic concepts of Git, with examples, which you will need in day to day work.
We will not be going into the details a lot as it will only confuse the beginners and you will be provided with a set of links towards the end of this where you can get more information. Let’s get started.
Fig. below show the basic workflow of Git.
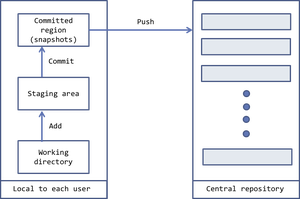
Git, as in any other Version Control Systems (VCS), operates in 2 regions, one is the central repository and the other region is the one which is local to each user(who clones the repository).
In the local repository, again there are 3 layers.
Working directory — This the your working directory where you will be editing the files.
Staging area — Once you are done editing the files in the working directory, choose the files which you want to commit. These files can then be ADDed to the staging area.
Committed region — The staged files can now be COMMITted into the committed region. This contains all your commits. Remember, till this point, all the changes are still in your local system.
Finally, you can ‘PUSH’ all the changes from the local repository to the central repository.
Please follow the below steps to get a hang of GIT in general. This assumes that you have an active BitBucket account.
Go to your Windows command prompt or the Linux/Mac terminal. In Windows, you can use ‘Git bash’ for easy operation.
Switch into the directory, where you want your repository to reside.
Type the commands as shown in the screenshot below :
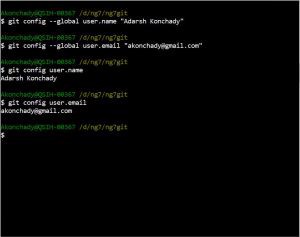
‘git config’ allows to define configurations for your git repositories. Here we define the user name (<first_name last_name>) and user email address which will be used by GIT for all commits that you do.
If you wish to use a different email address only for specific commits or for specific repositories, you can provide the ‘git config’ command inside the specific repository folder and omit the ‘ — global’ flag.
Eg: $ git config user.name “Adarsh Konchady”
Eg: $ git config user.email “akonchady@gmail.com”
Next create a GIT repo and switch into it as follows :
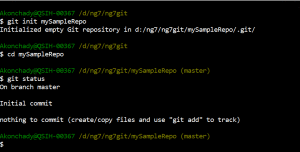
Here, we first create an empty Git repository using ‘git init <repository_name>’ and then switch into it.
‘git status’ gives you the status of the current working directory and the staging area. Please refer the first slide of this post again in case you have difficulties remembering the staging area :)
Let’s now create a file and add some lines into it. We will be using the default vim editor to do this. If you are not familiar with the ‘vim’ editor, you can go through this link for VIM editor commands.
Type ‘vim index.html’
Press ‘i’(insert) and start typing the contents.
Once done, key in Escape -> :wq
This will save the contents and return back to the prompt
To verify if file was successfully saved and view its contents, type
cat index.html
Now, check the status again by typing ‘git status’. You will see something as follows :
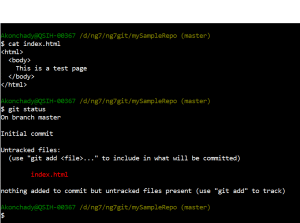
As you can see, the newly created file ‘index.html’ is shown in red color. This means your changes are still in the working directory.
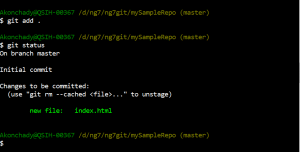
Let’s add this file to the staging area now.
Type ‘git add index.html’
Note, to add all untracked/modified files in the current directory recursively, you can type ‘git add .’. The period(.) indicates the current directory.
Now, type ‘git status’ again. You will see the file in ‘green’ color as follows :
Now that we are ready to commit our changes, let’s do it !
Type ‘git commit -m “My first commit”
Please note that it is mandatory to add a commit message while committing your changes. This is because when someone views your commits later on in the project cycle, he/she can actually pinpoint when a specific feature was pushed in and with which commit.
After you do this, press ‘git status’ again. You won’t see file names !! Surprising ???
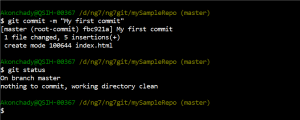
As mentioned earlier, ‘git status’ will only give you the status of the ‘working directory’ and the ‘staging area’.
If you want to see the changes of the committed region, type
git log

If you only want a short commit has code and the message, you can also type
git log — oneline
At this stage, we are done with all that has to be done in the local repository. It’s time to push your changes into the central repository so that others can see your changes!!!
To do this, follow the following steps:
Create the repository, viz. ‘mySampleRepo’.
Once the repository is created, click on the ‘Clone’ link on the left panel.
Copy the URL for HTTPS dropdown.
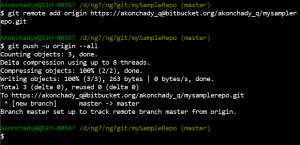
Come back to the command prompt/terminal and type the following commands :
git remote add origin ‘<url_copied_from_your_bitbucket_account>’
This will create a pointer ‘origin’ in your local repository which, from this point onwards, will be pointing to the central repository.
A ‘remote’ refers to a remote version of your repository.
git push -u origin — all
This will push all your local changes to the central repository
Congrats ! You are done with all the steps ! Enjoy !
Stay tuned for the next tutorial on branching and rebasing in Git.
Helpful Links
Atlassian Git tutorial — https://www.atlassian.com/git/tutorials
This is a quick guide to the git commands.
Gitolite — http://gitolite.com/gcs.html#(1))
This provides a clean graph representation of all the Git commands.
Git SCM book — http://git-scm.com/book/en/v2
If you really want to master Git, complete this book !!!