Supercharge Localhost Security with Caddy Server & NextJS

As a Senior Principal Engineer at CVSHealth, I specialize in building and optimizing cvs.com to deliver a superior guest experience. Using the latest web technologies, my team and I work diligently to create a user-friendly and intuitive platform that exceeds expectations.
Intro
Setting up a NextJS project is exciting, but securing the localhost environment for testing and development can be challenging. To enable a common usecase of accessing cookies from the production domain (e.g., example.com) while working locally, a specific domain setup like localhost.example.com is needed. This integration streamlines development and ensures seamless functionality within a secure localhost environment.
To be honest, there's nothing other than 1 specific step in this article that talks about configuring things for NextJS projects. So the steps should be widely applicable to other projects as well.
Caddy server is a powerful, enterprise-ready open source web server with automatic HTTPS support. Let's see how we can use this to make your localhost experience better.
Steps
This article assumes
you're on a Mac. So you might have to find the necessary alternatives for certain aspects in other operating systems.
you're setting up a local environment for
www.example.com. Replace this with your domain name.you're setting up a mapping to a NextJS web application that's running on port 3000.
First off, you'll need to map localhost.example.com to localhost . Run
sudo vim /etc/hosts
and add the mapping to the end of this file. A sample here but remember to replace the name with your domain:
127.0.0.1 localhost.example.com
Assuming your app runs on port 3000, create Caddyfile in your home directory (vim ~/Caddyfile) with the following contents again replacing your name :
localhost.example.com {
    tls internal

    reverse_proxy / localhost:3000
    reverse_proxy /_next/* localhost:3000
}
The first line specifying
tls internalensures Caddy server doesn't go to the public internet to get certificates. Even though you might own this domain in this case, we're doing internal TLS to generate a certificate locally. This helps especially in an enterprise environment where you may not have control over the domain but still want to do localhost development on a project.reverse_proxy / localhost:3000- This ensures the home page path maps to localhost:3000. Notice we don't specify*here as that would stop us from mapping more paths for other sites.reverse_proxy /_next/* localhost:3000- This line is specific to a NextJS project. NextJS serves its assets locally under_nextfolder. So by mapping all assets under this path tolocalhost:3000, we ensure things work as expected.
caddy start --config ~/Caddyfile
You'll see the following popup on MacOS to allow Caddy to provision a certificate in your operating system.
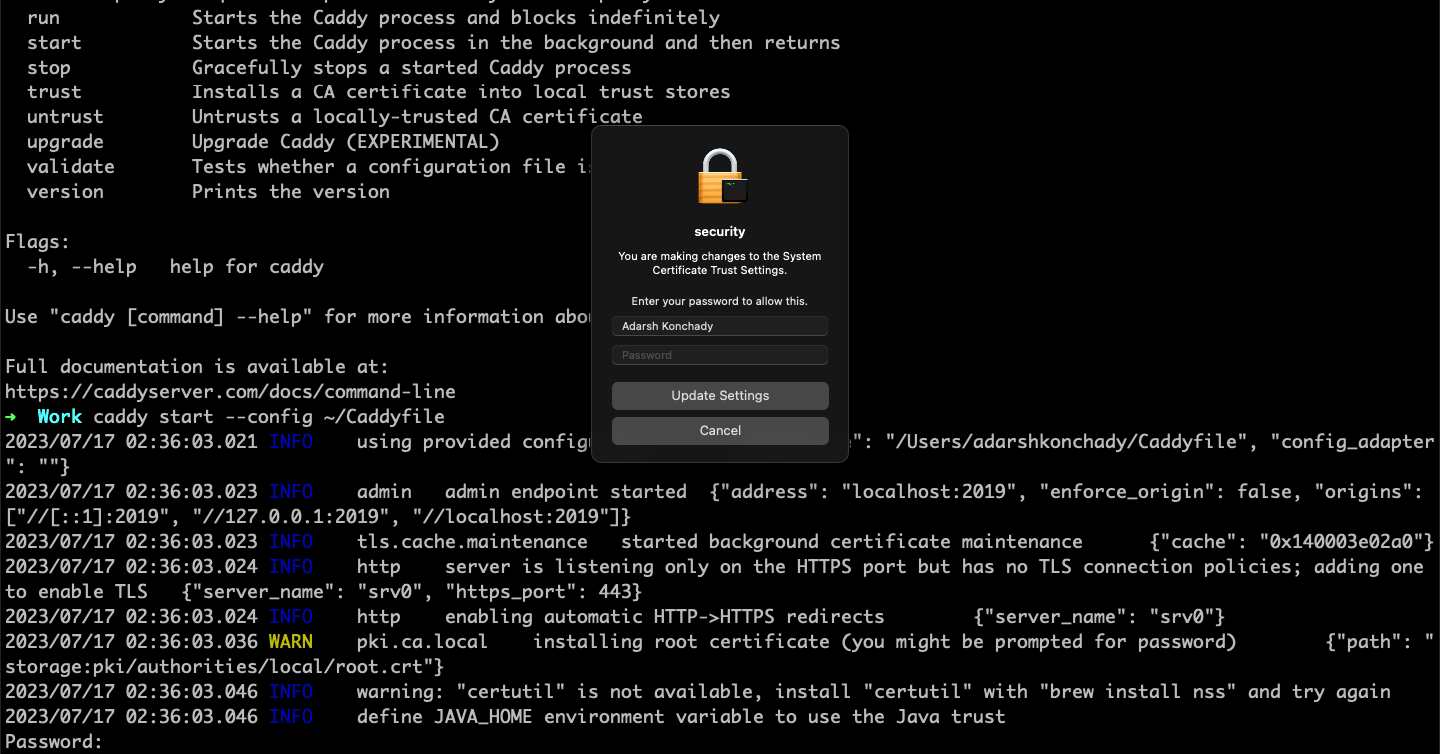
Provide the password and hit Update Settings.
Go to your browser and hit https://localhost.example.com now! You should see your local site now has a HTTPS certificate and is able to get cookies from your production domain as expected!
Next steps
You can now use additional reverse_proxy directives in your Caddyfile to configure additional sites. For example, use the following config to add a new NextJS fancy-next-app project mapping.
localhost.example.com {
    tls internal

    reverse_proxy / localhost:3000
    reverse_proxy /_next/* localhost:3000

    reverse_proxy /fancy-new-app localhost:3001
    reverse_proxy /fancy-new-app/_next/* localhost:3001
}
Logging
If you want to debug any Caddy requests that are not being served correctly, you can use the log block in your Caddyfile:
localhost.example.com {
    ...
    log {
        output stdout
        level DEBUG
    }
}
Reload Caddy config
You can decide to have these Caddyfile configs configured per Github repo. In such cases, you might want to reload Caddy configs when switching repos. You can use the following command to do that:
caddy reload --config ./Caddyfile # --config is optional if the current directory has a Caddyfile
Stop Caddy
You can stop Caddy server with the following command:
caddy stop
Conclusion
These steps should get you set up for a smoother web development experience on your next project. So, don't overlook the importance of configuring a secure localhost setup and maximizing the potential of your NextJS project. Happy coding!